Cartridge-based TIJ print height is set by print swath: 12.7 mm half-inch, 25.4 mm one-inch. Covers GS1 bar height rules, multi-head stitching and a pre-quote checklist.
Maximum TIJ Print Height: Key Specifications to Know Before Selection
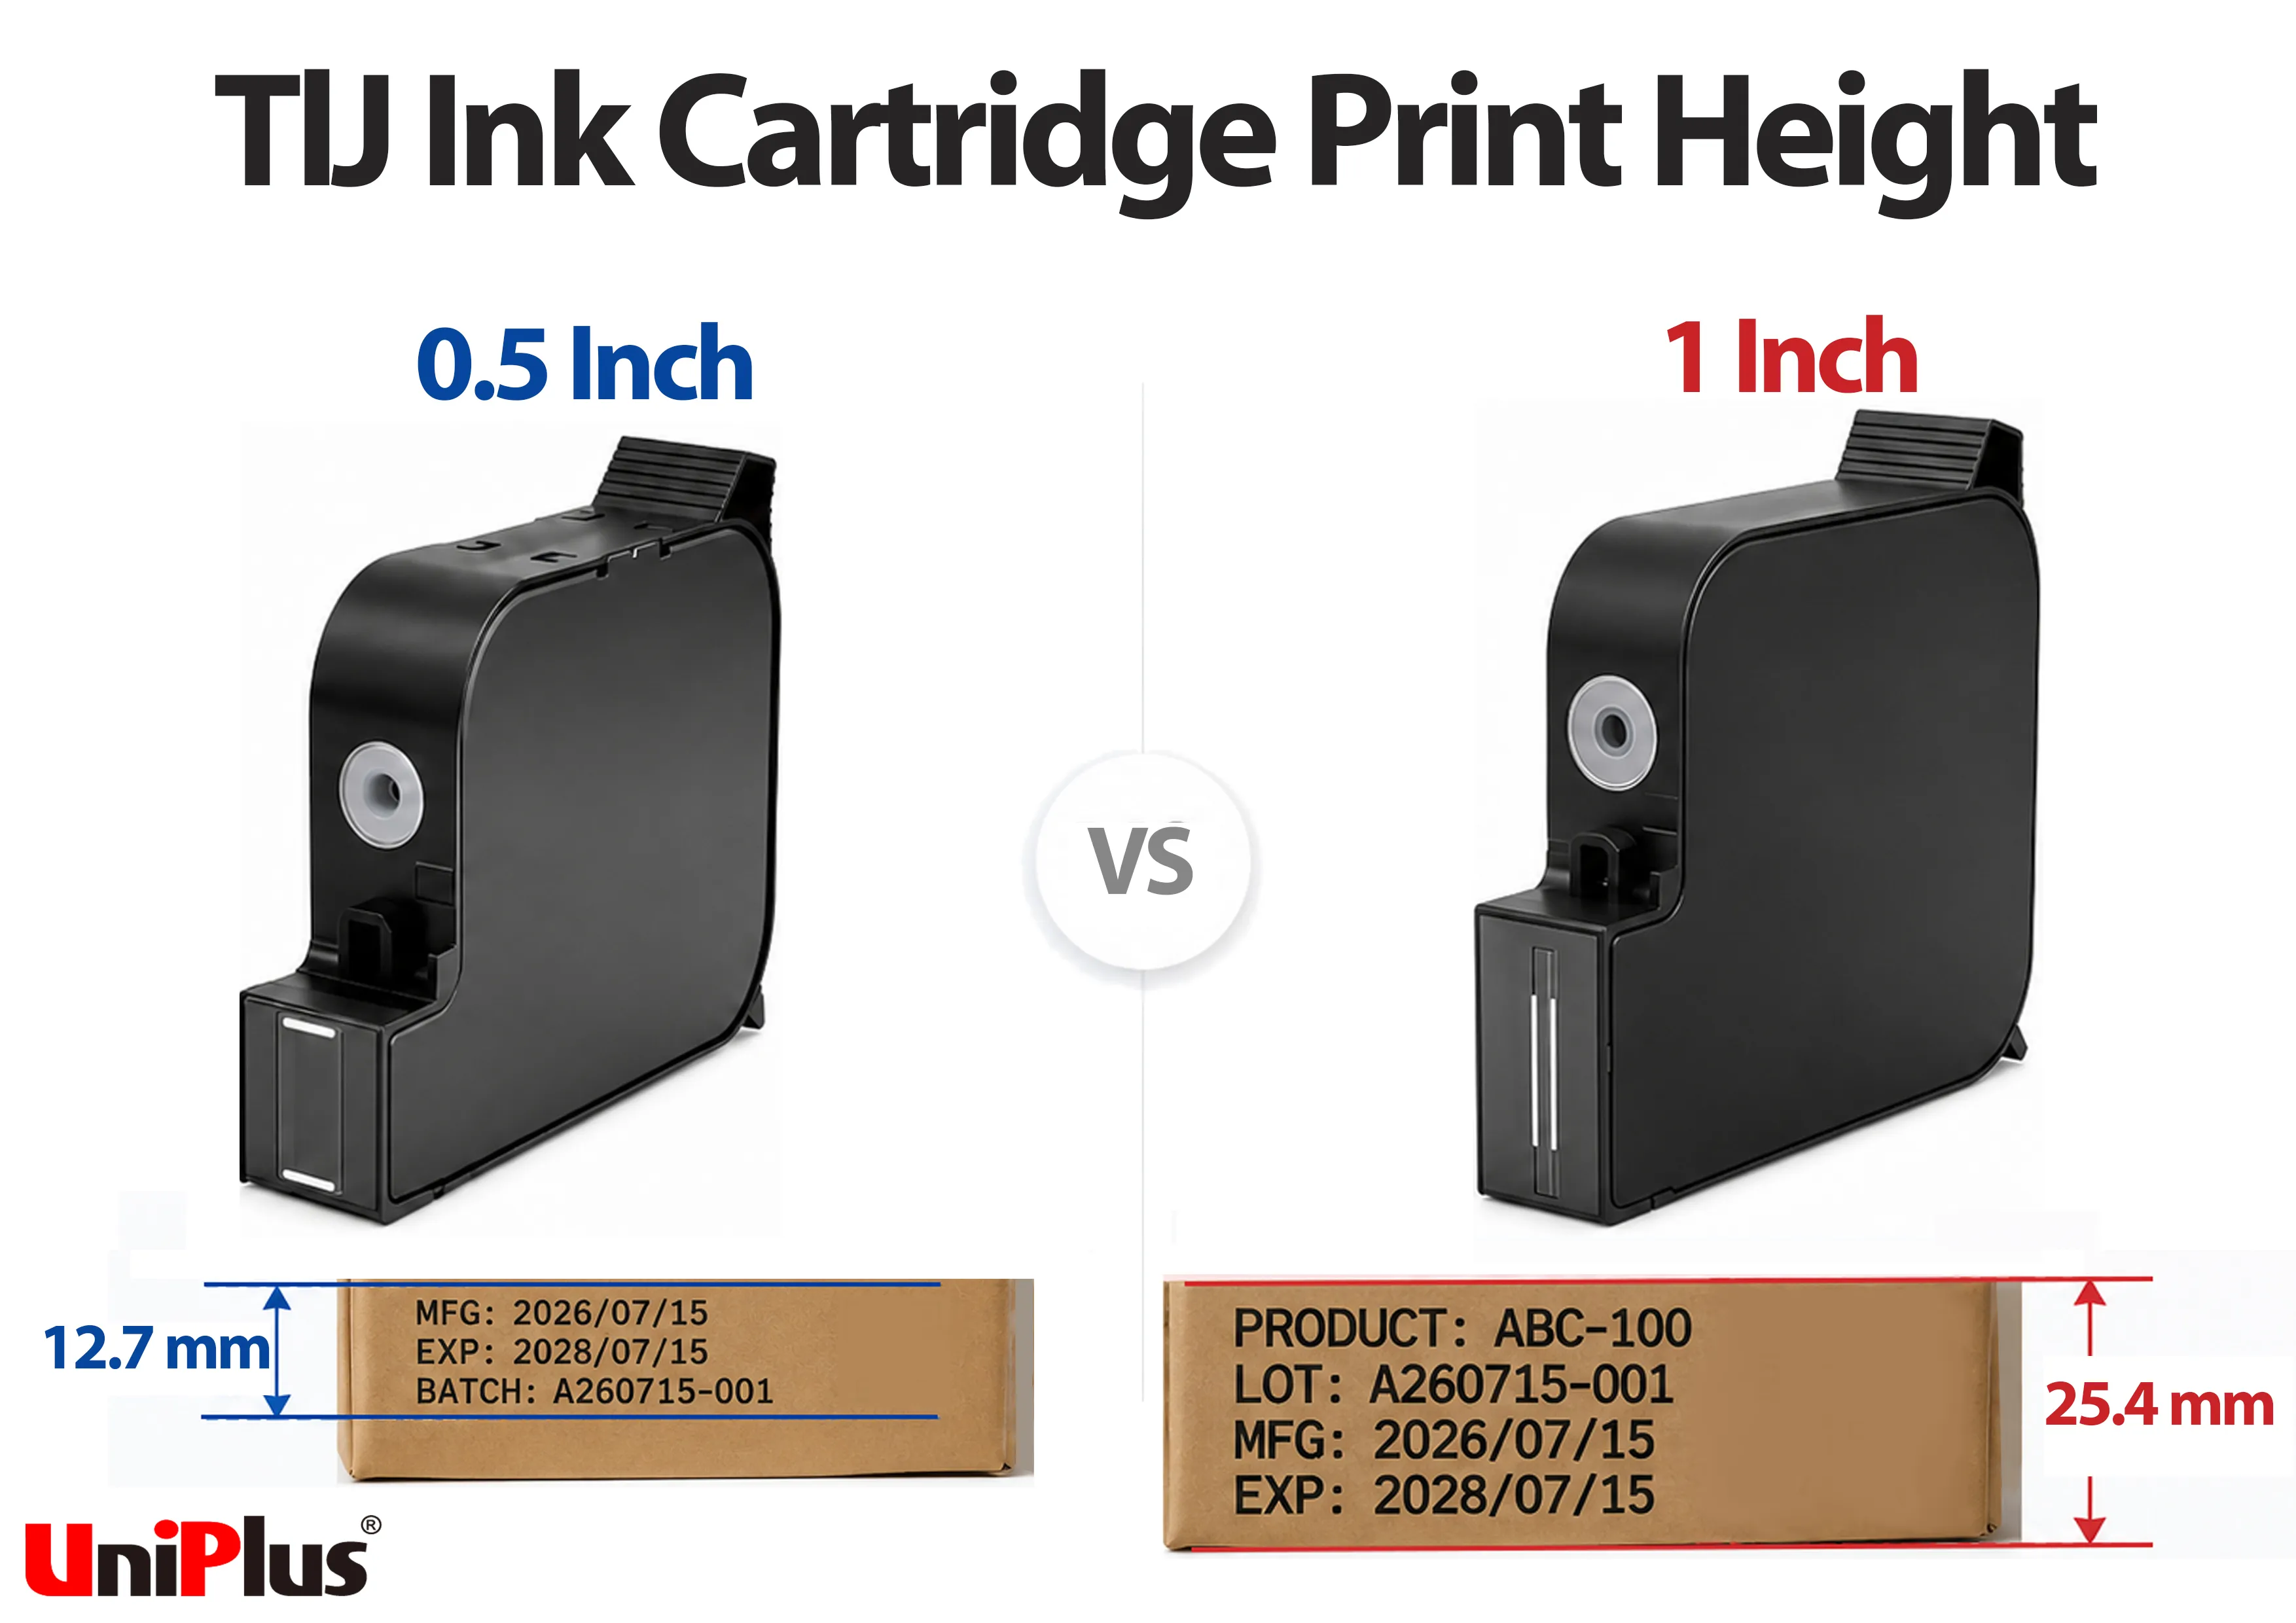
On a thermal inkjet (TIJ) coding printer, the height you can print in a single pass depends on the cartridge format. Half-inch cartridges give 12.7 mm (0.5"). One-inch industrial cartridges give 25.4 mm (1").
Buyers misread that figure often. Some treat it as the largest character size available. Others assume it matches the printable area the machine actually offers. Both assumptions can put a printer on your line that falls a millimeter or two short of what you need.
What Is the Maximum Print Height of a Cartridge-Based TIJ Printer?
The nozzle array on the printhead sets the limit. However far those nozzles extend vertically, a span called the print swath — is how tall an image the cartridge can produce in one pass. No software setting moves that boundary.
Most half-inch industrial cartridges follow HP's TIJ 2.5 platform, the technology standard behind the 12.7 mm swath. One-inch cartridges are a separate industrial format.
Configuration
Maximum Single-Pass Print Height
Typical Printed Content
Half-inch (0.5") industrial cartridge
12.7 mm (0.5")
Date codes, lot numbers, compact 2D codes
One-inch (1") industrial cartridge
25.4 mm (1")
Large character marking, multi-line traceability data
Multi-head stitching
Depends on head count and arrangement
Larger-format text and graphics
How Tall Can a 0.5-Inch TIJ Cartridge Print?
Up to 12.7 mm (0.5") in a single pass. It is one of the standard TIJ printhead heights in common use.
That height suits a single line of date code, a lot number, or a compact 2D code.
Split the content across several lines and 12.7 mm gets tight fast. What eats the space is the sum of the line heights, not the character height on its own.
How Tall Can a 1-Inch TIJ Cartridge Print?
Up to 25.4 mm (1") in a single pass — roughly double the half-inch format. Cartons needing large characters, or three-plus lines of traceability data, are the usual reason to go this route.
One caveat. A one-inch cartridge needs the machine to accept that size at three points:
The cartridge stall — HP's term for the holder the cartridge snaps into.
The drive electronics.
The print channel that feeds it data.
Not every TIJ printer can take one.
Is 25.4 mm the Maximum Print Height for All TIJ Printers?
No. 25.4 mm is the upper print height of the half-inch and one-inch cartridge formats discussed in this article, not a limit of TIJ technology itself.
Wider TIJ architectures exist. HP's TIJ-based FI-1000 print engine reaches 297.18 mm — a different class of system entirely. This article stays with the half-inch and one-inch cartridge printers used for production-line coding.
Print Height Versus Character Height
Print height is the total vertical space available. Character height is the size of a single character within it.
Mixing up the two is the most common misunderstanding we see during inquiries, and one of the main reasons a printer arrives on site with too little height.
Print Swath Defined
Print swath is the vertical span covered by the nozzle array on the printhead. It sets how tall an image the printer can lay down in one pass: 12.7 mm for the half-inch format, 25.4 mm for the one-inch industrial format.
This is a hardware number. Font settings come later and cannot change it.
Printable Area Versus Nominal Print Height
Nominal print height is the cartridge specification. Printable area is the layout range the printer manufacturer publishes.
On some machines the printable area may be smaller than the nominal swath, because of the controller, the font engine, or how the printhead is mounted.
Plan your layout against the printable area in the printer datasheet, not the cartridge figure alone.
Character Height, Line Height and Multi-Line Layout
Three measurements do the work here:
Character height: the height of a single character.
Line height: character height plus line spacing.
Print height: the total vertical space you have to work with.
In a multi-line layout, the line heights added together are what consume the budget. A 12.7 mm swath could carry one character close to 12 mm, or several lines of smaller text.
Which TIJ Print Height Should You Choose: 12.7 mm or 25.4 mm?
Establish how much vertical space your content needs first. Then check which cartridge sizes your existing equipment supports.
If the layout exceeds 12.7 mm, start evaluating the one-inch or multi-head routes. Barcode requirements, machine compatibility and planned expansion can all shift the decision too, so a layout that fits today does not automatically close the question.
When Is a 12.7 mm TIJ Printer Enough?
Usually when the content is one line — a date code, a lot number, an expiry date — and no barcode height requirement applies.
The 12.7 mm swath has broad equipment and consumable availability, which helps with sourcing and replacement.
When Should You Choose a 25.4 mm TIJ Printer?
25.4 mm gives you room in two situations. The first is large characters that have to be readable from a distance across a carton. The second is when product name, lot number, country of origin and a traceability code all need their own line.
It also sits closer to barcode height requirements than the half-inch format. Even so, 25.4 mm may still fall short of what a barcode specification requires, the GS1 section below sets out the numbers.
Can a 12.7 mm TIJ Printer Be Upgraded to 25.4 mm?
Buying new? The question stops at which format to specify. Already have a printer on the line? Check the upgrade path first.
Do not assume the two formats are interchangeable. A one-inch cartridge needs support at the cartridge stall, the drive electronics and the print channel.
From there, three outcomes are possible:
The printer supports both: Some designs switch between 12.7 mm and 25.4 mm with a hardware change such as a different printhead module.
The printer supports one size only: No upgrade path exists without replacing the printer.
Multi-head instead: Stacking heads on the existing machine reaches the height by a different route.
The most practical upgrade path depends on three factors:
Controller support: whether it can drive the larger format.
Mechanical space: whether the mount accommodates it.
Modification complexity: how much on-site work is involved.
This is a machine-specific design question. Confirm feasibility with the printer manufacturer rather than inferring it from the similarity in size.
Working Backwards From Content to Required Height
Confirm what you need to print and how many lines it occupies. Then work backwards to the millimeters required.
Starting from printer specifications instead tends to produce a machine whose height falls just short. In practice, work through three steps:
List the fields: Production date, expiry date, lot number, country of origin, traceability code, barcode. Mark which are required now and which customers or regulations may add later.
Decide the layout: One line across, or several.
Add it up: Character heights plus line spacing gives you the vertical space needed.
Single-Line Date Codes and Lot Numbers
There is no universal recommended character height. It depends on viewing distance, font, and what your customer, retailer or the applicable regulation requires.
A single line of date code or lot number usually leaves headroom within the half-inch format. Enlarge the characters for a longer reading distance, though, and that headroom disappears quickly. Confirm the required character height first, then work upward from there.
Multi-Line Traceability Data
Calculate it as character height × number of lines + total line spacing. Multiplying character heights alone will understate the result.
The same three lines can occupy noticeably different totals depending on the line spacing you configure. And where the content includes a barcode, that barcode usually needs more vertical space than the text — calculate it separately, then combine.
Headroom for Future Fields
In Uniplus's experience, buyers underestimate print height regularly. The pattern repeats:
At procurement: The sample shows a single line of date code, and the buyer specifies the printer around that layout alone.
After commissioning: Customers or regulations add lot numbers, country of origin and traceability codes. One line becomes three.
The result: A printer that fit the original brief no longer fits the current one.
Factor in the fields likely to appear over the next year or two and you will usually find you need more headroom than first assumed. Reserving margin at the planning stage costs far less than discovering a 1 mm shortfall afterward.
What Bar Height Is Required for ITF-14 and GS1-128?
If your content includes a barcode or a regulated label element, required height is no longer just a layout question. Bar height and minimum character height can both drive the equipment specification directly.
A 1D barcode usually needs more vertical space than text, and there is a published specification to check it against.
Bar height is worth confirming item by item during procurement, because a barcode that scans successfully is not necessarily compliant with the applicable GS1 dimensional requirements.
What Is the Minimum Bar Height for General Distribution Scanning?
General Distribution Scanning is GS1's term for the automated scanning environments found in distribution and logistics. Under the GS1 General Specifications, three height levels apply to ITF-14 and GS1-128 in that environment:
Standard: 31.75 mm (1.250 in). Bars only — this excludes the human readable interpretation and the ITF-14 bearer bars (the protective outer frame printed around the symbol).
First reduction: 12.70 mm (0.500 in). Permitted only where the trade item — the product or case being marked — is physically too small for the standard height.
Absolute minimum: 5.08 mm (0.200 in). Where space is more constrained still.
Can You Shorten a GS1 Barcode Because Your TIJ Printer Is Too Small?
A printer limited to 12.7 mm is not a reason to shorten a barcode to 12.7 mm. Equipment capability is not a permitted basis for applying the GS1 reduction exception. GS1 permits the reduction when the trade item is physically too small. Printer capability is not part of that test.
Say General Distribution Scanning specifications apply and the item itself can accommodate 31.75 mm. You cannot invoke the reduction because your printer offers a 12.7 mm swath. And if a customer requires verification to GS1 specifications, a scanner reading the code on your line does not establish that it meets the required dimensions.
Both 12.7 mm and 25.4 mm sit below the 31.75 mm standard. In the configurations discussed here, a single cartridge does not deliver the bar height that ITF-14 and GS1-128 require for general distribution scanning.
How Is 1D Barcode Print Quality Verified?
GS1 notes that reducing symbol height may affect scanning performance. "It reads on site today" is not a sound basis for shortening bar height.
ISO/IEC 15416 (currently the 2025 third edition) defines how to measure and grade 1D barcode print quality. Among its parameters is the scan reflectance profile — a measurement of how light and dark register across the code as a verifier reads it.
Use a verifier to establish whether a printed code passes. Printer specifications will not tell you.
What Is the Minimum Character Height for EU Food Labels?
Labeling regulation is the other requirement that can set your height. One point to establish first: regulation governs the label, not the TIJ technology. EU food information law says nothing about how large a TIJ printer must print. What it says is that mandatory particulars must not fall below a given size.
That floor runs in the opposite direction from the ceiling your cartridge sets. In a multi-line layout, both apply at once.
When Does the 1.2 mm X-Height Requirement Apply?
Article 13(2) of EU Regulation No 1169/2011 sets a minimum x-height of 1.2 mm (EUR-Lex text).
X-height is the height of a lowercase "x", which is smaller than the overall font size. Specify 1.2 mm font size and you will fall short of the requirement.
It applies to the mandatory particulars listed in Article 9(1), printed on the package or on a label attached to it.
The requirement attaches to the mandatory particulars, not to every piece of text on the pack. Where specific Union provisions apply to a particular food, those provisions take precedence.
When Can the Minimum X-Height Be 0.9 mm?
Article 13(3) lowers the floor to 0.9 mm where the largest surface of the packaging or container measures less than 80 cm².
The test is the physical size of the pack, not what your coding printer can do — the same logic as the GS1 bar height reduction above. Whether the more permissive floor is available depends on how large the item is, not on how small the printer can print.
How Is Regulatory Character Height Different From TIJ Print Height?
Regulation sets a minimum. The cartridge sets a maximum. Between them, they determine how many lines will fit.
Say the applicable rules require a character height no smaller than a given value, and your content runs to three lines. Three character heights plus line spacing becomes the floor for the print height you need. Compare that floor against your 12.7 mm swath.
At that point, fitting the content is no longer a layout problem. It is a question of whether the specification is adequate.
Products sold into different markets may face different labeling rules, so confirm the applicable requirements during selection.
Four Routes When One Printhead Is Not Tall Enough
Four routes are worth evaluating. None is inherently better than the others. The decision depends on three things: how much expansion capability your existing printer has, your line speed requirement, and the marking format your customers specify.
Switching to a 25.4 mm Printhead
Yes, if your printer supports a one-inch cartridge stall and the matching print channel.
One cartridge reaching 25.4 mm keeps the setup simple. You avoid the alignment and timing work that stitching brings. Where the printer does not support it, assess whether the printhead module can be changed.
Stacking Multiple Printheads
Yes. Stack two or more cartridges vertically, give each one a portion of the height, and together they form the complete image. This is a common way to extend height on existing half-inch equipment.
The trade-off is added integration work — mechanical positioning, print timing and data distribution, all covered in the next section.
Moving to a Wider-Format System
When the requirement runs well beyond 25.4 mm and the content looks more like full-surface graphics than coding.
At that point this is no longer a cartridge-selection question. Wide-format TIJ systems, other printing architectures and pre-printed labels all normally mean replanning the line, so settle the requirement before evaluating them.
Reducing Height Through Layout Changes
Often, yes. Reducing character height, cutting the number of lines and repositioning fields are all standard measures.
Swapping a 1D barcode for a 2D code to save height frequently works geometrically. What it cannot do is override a specification.
The data carrier — the barcode type that carries GS1 data — is fixed wherever GS1, customer specifications or particular regulations apply. On logistic units such as cases and pallets, current GS1 rules require GS1-128 as the mandatory carrier. They permit GS1 DataMatrix and GS1 QR Code alongside it, and restrict standalone use to certain small units.
Confirm the applicable data carrier specification before changing carrier.
If layout changes cannot recover enough height, multi-head stitching is usually the next option to assess.
Multi-Head Stitching: Alignment, Timing and Data
Multi-head implementation comes down to three things: alignment, timing and data. The approaches below are common on commercially available TIJ controllers, not the only possible architecture.
Mechanical Alignment and Staggered Mounting
Cartridge bodies have physical width. In many multi-head configurations, two printheads cannot simply be butted vertically along the same transport axis.
A staggered arrangement solves this — one head sits slightly ahead of the other along the conveyor. The controller then compensates for that positional offset so the two image bands line up on the substrate.
How rigid the mounting bracket is, and how finely you can adjust it, shape the difficulty directly. If the bracket works loose or deforms, compensation accuracy will not hold.
Timing Synchronization With Line Speed
Staggered printheads reach the same point at different moments, so the trailing head fires after a delay.
That delay has to track line speed. Controllers normally derive it from a line-speed encoder — a sensor that measures how fast product is moving past the printhead.
When speed becomes unstable, the usual symptom is misregistration at the stitch: the two bands no longer meet cleanly. Timing synchronization is a critical integration requirement, and it tends to surface only after a line is sped up.
Splitting Print Data Across Printheads
The controller divides one artwork into two or more bands and sends each to a different printhead, following the split position you configure.
Choosing that position is both a technical setting and part of layout design. Put the split between characters or in white space and it is far easier to manage than a split running through the middle of a character.
Barcodes Crossing a Stitch Line
You can configure it, but the risk is higher and it is better avoided at the planning stage.
Positional deviation between printheads affects dimensional accuracy at the boundary, and dimensional accuracy is what barcode readability depends on.
Where your layout leaves no alternative, do not judge acceptability by eye. Verify the printed code against ISO/IEC 15416 or your customer's specified standard before committing.
When a customer reports a poor stitch, the cartridge is usually not the variable. In the cases Uniplus has helped troubleshoot, the cause more often sits in a loosened bracket, offset compensation that was never updated after a speed change, or a split position that happens to fall across a barcode. Checking those three first tends to save time before any consumable is replaced.
Print-Height Checklist Before You Request a Quote
This is the RFQ version of the calculation above — the same inputs, organized for a supplier. Having it ready before you request a quote reduces the specification clarifications and quotation revisions that follow.
Content and Layout Requirements
Gather five things:
Current fields: Everything printed today.
Future fields: Anything likely to be added over the next year or two.
Number of lines: How the content will be arranged.
Character height and line spacing: What each line requires.
Printable area on the substrate: Its dimensions, and whether the surface is flat.
Applicable Barcode and Labeling Standards
Confirm whether a 1D barcode is included, which barcode specification governs it, and whether downstream scanning is handheld or automated on a conveyor.
Where General Distribution Scanning specifications apply, also confirm whether the item's physical dimensions can accommodate the standard bar height. Gather any labeling regulations covering the product or packaging, plus marking dimensions your customer has specified.
Supported Cartridge Sizes and Print Channels
Provide your printer model, the cartridge formats it accepts and the number of print channels available.
This determines whether extending height later means fitting a one-inch cartridge or moving to a multi-head configuration. You can review cartridges in each format on the TIJ 2.5 industrial ink cartridge line.
The Printer's Actual Printable Height
Work from the printable area the manufacturer publishes, not the nominal printhead swath alone. On some machines the controller, the font settings or the mechanical configuration constrain the usable layout range below the cartridge figure.
Provide your current line speed and note any planned increase.
On a single-head printer, speed affects how much margin you have on print quality. On a multi-head configuration it also drives the timing synchronization settings, so a higher line speed may require synchronization recalibration.
Send Us Your Printer Model and Print Layout
Your printer model tells us which cartridge formats and print channels are available. Your layout tells us how much height you actually need. With both in hand, we can usually establish in one pass whether your existing equipment is sufficient, or whether the one-inch or multi-head route needs evaluating.
Compare 12.7 mm and 25.4 mm TIJ Cartridge Options
Already know you need a taller print area? We can lay out the applicable conditions, equipment prerequisites and consumable supply for each format. You will be able to see which one suits your line.
Share this article to your friends
Maximum TIJ Print Height: Key Specifications to Know Before Selection
In This Article
On a thermal inkjet (TIJ) coding printer, the height you can print in a single pass depends on the cartridge format. Half-inch cartridges give 12.7 mm (0.5"). One-inch industrial cartridges give 25.4 mm (1").
Buyers misread that figure often. Some treat it as the largest character size available. Others assume it matches the printable area the machine actually offers. Both assumptions can put a printer on your line that falls a millimeter or two short of what you need.
What Is the Maximum Print Height of a Cartridge-Based TIJ Printer?
The nozzle array on the printhead sets the limit. However far those nozzles extend vertically, a span called the print swath — is how tall an image the cartridge can produce in one pass. No software setting moves that boundary.
Most half-inch industrial cartridges follow HP's TIJ 2.5 platform, the technology standard behind the 12.7 mm swath. One-inch cartridges are a separate industrial format.
How Tall Can a 0.5-Inch TIJ Cartridge Print?
Up to 12.7 mm (0.5") in a single pass. It is one of the standard TIJ printhead heights in common use.
That height suits a single line of date code, a lot number, or a compact 2D code.
Split the content across several lines and 12.7 mm gets tight fast. What eats the space is the sum of the line heights, not the character height on its own.
How Tall Can a 1-Inch TIJ Cartridge Print?
Up to 25.4 mm (1") in a single pass — roughly double the half-inch format. Cartons needing large characters, or three-plus lines of traceability data, are the usual reason to go this route.
One caveat. A one-inch cartridge needs the machine to accept that size at three points:
Not every TIJ printer can take one.
Is 25.4 mm the Maximum Print Height for All TIJ Printers?
No. 25.4 mm is the upper print height of the half-inch and one-inch cartridge formats discussed in this article, not a limit of TIJ technology itself.
Wider TIJ architectures exist. HP's TIJ-based FI-1000 print engine reaches 297.18 mm — a different class of system entirely. This article stays with the half-inch and one-inch cartridge printers used for production-line coding.
Print Height Versus Character Height
Print height is the total vertical space available. Character height is the size of a single character within it.
Mixing up the two is the most common misunderstanding we see during inquiries, and one of the main reasons a printer arrives on site with too little height.
Print Swath Defined
Print swath is the vertical span covered by the nozzle array on the printhead. It sets how tall an image the printer can lay down in one pass: 12.7 mm for the half-inch format, 25.4 mm for the one-inch industrial format.
This is a hardware number. Font settings come later and cannot change it.
Printable Area Versus Nominal Print Height
Nominal print height is the cartridge specification. Printable area is the layout range the printer manufacturer publishes.
On some machines the printable area may be smaller than the nominal swath, because of the controller, the font engine, or how the printhead is mounted.
Plan your layout against the printable area in the printer datasheet, not the cartridge figure alone.
Character Height, Line Height and Multi-Line Layout
Three measurements do the work here:
In a multi-line layout, the line heights added together are what consume the budget. A 12.7 mm swath could carry one character close to 12 mm, or several lines of smaller text.
How much you can actually fit still depends on the font and layout settings of your printer. The TIJ Specification Selection Guide: Print Height, DPI and Cartridge Size works through how these parameters relate to one another.
Which TIJ Print Height Should You Choose: 12.7 mm or 25.4 mm?
Establish how much vertical space your content needs first. Then check which cartridge sizes your existing equipment supports.
If the layout exceeds 12.7 mm, start evaluating the one-inch or multi-head routes. Barcode requirements, machine compatibility and planned expansion can all shift the decision too, so a layout that fits today does not automatically close the question.

When Is a 12.7 mm TIJ Printer Enough?
Usually when the content is one line — a date code, a lot number, an expiry date — and no barcode height requirement applies.
The 12.7 mm swath has broad equipment and consumable availability, which helps with sourcing and replacement.
When Should You Choose a 25.4 mm TIJ Printer?
25.4 mm gives you room in two situations. The first is large characters that have to be readable from a distance across a carton. The second is when product name, lot number, country of origin and a traceability code all need their own line.
It also sits closer to barcode height requirements than the half-inch format. Even so, 25.4 mm may still fall short of what a barcode specification requires, the GS1 section below sets out the numbers.
Can a 12.7 mm TIJ Printer Be Upgraded to 25.4 mm?
Buying new? The question stops at which format to specify. Already have a printer on the line? Check the upgrade path first.
Do not assume the two formats are interchangeable. A one-inch cartridge needs support at the cartridge stall, the drive electronics and the print channel.
From there, three outcomes are possible:
The most practical upgrade path depends on three factors:
This is a machine-specific design question. Confirm feasibility with the printer manufacturer rather than inferring it from the similarity in size.
Working Backwards From Content to Required Height
Confirm what you need to print and how many lines it occupies. Then work backwards to the millimeters required.
Starting from printer specifications instead tends to produce a machine whose height falls just short. In practice, work through three steps:
Single-Line Date Codes and Lot Numbers
There is no universal recommended character height. It depends on viewing distance, font, and what your customer, retailer or the applicable regulation requires.
A single line of date code or lot number usually leaves headroom within the half-inch format. Enlarge the characters for a longer reading distance, though, and that headroom disappears quickly. Confirm the required character height first, then work upward from there.
Multi-Line Traceability Data
Calculate it as character height × number of lines + total line spacing. Multiplying character heights alone will understate the result.
The same three lines can occupy noticeably different totals depending on the line spacing you configure. And where the content includes a barcode, that barcode usually needs more vertical space than the text — calculate it separately, then combine.
Headroom for Future Fields
In Uniplus's experience, buyers underestimate print height regularly. The pattern repeats:
Factor in the fields likely to appear over the next year or two and you will usually find you need more headroom than first assumed. Reserving margin at the planning stage costs far less than discovering a 1 mm shortfall afterward.
What Bar Height Is Required for ITF-14 and GS1-128?
If your content includes a barcode or a regulated label element, required height is no longer just a layout question. Bar height and minimum character height can both drive the equipment specification directly.
A 1D barcode usually needs more vertical space than text, and there is a published specification to check it against.
Bar height is worth confirming item by item during procurement, because a barcode that scans successfully is not necessarily compliant with the applicable GS1 dimensional requirements.
What Is the Minimum Bar Height for General Distribution Scanning?
General Distribution Scanning is GS1's term for the automated scanning environments found in distribution and logistics. Under the GS1 General Specifications, three height levels apply to ITF-14 and GS1-128 in that environment:
Can You Shorten a GS1 Barcode Because Your TIJ Printer Is Too Small?
A printer limited to 12.7 mm is not a reason to shorten a barcode to 12.7 mm. Equipment capability is not a permitted basis for applying the GS1 reduction exception.
GS1 permits the reduction when the trade item is physically too small. Printer capability is not part of that test.
Say General Distribution Scanning specifications apply and the item itself can accommodate 31.75 mm. You cannot invoke the reduction because your printer offers a 12.7 mm swath. And if a customer requires verification to GS1 specifications, a scanner reading the code on your line does not establish that it meets the required dimensions.
Both 12.7 mm and 25.4 mm sit below the 31.75 mm standard. In the configurations discussed here, a single cartridge does not deliver the bar height that ITF-14 and GS1-128 require for general distribution scanning.
How Is 1D Barcode Print Quality Verified?
GS1 notes that reducing symbol height may affect scanning performance. "It reads on site today" is not a sound basis for shortening bar height.
ISO/IEC 15416 (currently the 2025 third edition) defines how to measure and grade 1D barcode print quality. Among its parameters is the scan reflectance profile — a measurement of how light and dark register across the code as a verifier reads it.
Use a verifier to establish whether a printed code passes. Printer specifications will not tell you.
What Is the Minimum Character Height for EU Food Labels?
Labeling regulation is the other requirement that can set your height. One point to establish first: regulation governs the label, not the TIJ technology. EU food information law says nothing about how large a TIJ printer must print. What it says is that mandatory particulars must not fall below a given size.
That floor runs in the opposite direction from the ceiling your cartridge sets. In a multi-line layout, both apply at once.
When Does the 1.2 mm X-Height Requirement Apply?
Article 13(2) of EU Regulation No 1169/2011 sets a minimum x-height of 1.2 mm (EUR-Lex text).
X-height is the height of a lowercase "x", which is smaller than the overall font size. Specify 1.2 mm font size and you will fall short of the requirement.
It applies to the mandatory particulars listed in Article 9(1), printed on the package or on a label attached to it.
The requirement attaches to the mandatory particulars, not to every piece of text on the pack. Where specific Union provisions apply to a particular food, those provisions take precedence.
When Can the Minimum X-Height Be 0.9 mm?
Article 13(3) lowers the floor to 0.9 mm where the largest surface of the packaging or container measures less than 80 cm².
The test is the physical size of the pack, not what your coding printer can do — the same logic as the GS1 bar height reduction above. Whether the more permissive floor is available depends on how large the item is, not on how small the printer can print.
How Is Regulatory Character Height Different From TIJ Print Height?
Regulation sets a minimum. The cartridge sets a maximum. Between them, they determine how many lines will fit.
Say the applicable rules require a character height no smaller than a given value, and your content runs to three lines. Three character heights plus line spacing becomes the floor for the print height you need. Compare that floor against your 12.7 mm swath.
At that point, fitting the content is no longer a layout problem. It is a question of whether the specification is adequate.
Products sold into different markets may face different labeling rules, so confirm the applicable requirements during selection.
Four Routes When One Printhead Is Not Tall Enough
Four routes are worth evaluating. None is inherently better than the others. The decision depends on three things: how much expansion capability your existing printer has, your line speed requirement, and the marking format your customers specify.
Switching to a 25.4 mm Printhead
Yes, if your printer supports a one-inch cartridge stall and the matching print channel.
One cartridge reaching 25.4 mm keeps the setup simple. You avoid the alignment and timing work that stitching brings. Where the printer does not support it, assess whether the printhead module can be changed.
Stacking Multiple Printheads
Yes. Stack two or more cartridges vertically, give each one a portion of the height, and together they form the complete image. This is a common way to extend height on existing half-inch equipment.
The trade-off is added integration work — mechanical positioning, print timing and data distribution, all covered in the next section.
Moving to a Wider-Format System
When the requirement runs well beyond 25.4 mm and the content looks more like full-surface graphics than coding.
At that point this is no longer a cartridge-selection question. Wide-format TIJ systems, other printing architectures and pre-printed labels all normally mean replanning the line, so settle the requirement before evaluating them.
Reducing Height Through Layout Changes
Often, yes. Reducing character height, cutting the number of lines and repositioning fields are all standard measures.
Swapping a 1D barcode for a 2D code to save height frequently works geometrically. What it cannot do is override a specification.
The data carrier — the barcode type that carries GS1 data — is fixed wherever GS1, customer specifications or particular regulations apply. On logistic units such as cases and pallets, current GS1 rules require GS1-128 as the mandatory carrier. They permit GS1 DataMatrix and GS1 QR Code alongside it, and restrict standalone use to certain small units.
Confirm the applicable data carrier specification before changing carrier.
If layout changes cannot recover enough height, multi-head stitching is usually the next option to assess.
Multi-Head Stitching: Alignment, Timing and Data
Multi-head implementation comes down to three things: alignment, timing and data. The approaches below are common on commercially available TIJ controllers, not the only possible architecture.
Mechanical Alignment and Staggered Mounting
Cartridge bodies have physical width. In many multi-head configurations, two printheads cannot simply be butted vertically along the same transport axis.
A staggered arrangement solves this — one head sits slightly ahead of the other along the conveyor. The controller then compensates for that positional offset so the two image bands line up on the substrate.
How rigid the mounting bracket is, and how finely you can adjust it, shape the difficulty directly. If the bracket works loose or deforms, compensation accuracy will not hold.
Timing Synchronization With Line Speed
Staggered printheads reach the same point at different moments, so the trailing head fires after a delay.
That delay has to track line speed. Controllers normally derive it from a line-speed encoder — a sensor that measures how fast product is moving past the printhead.
When speed becomes unstable, the usual symptom is misregistration at the stitch: the two bands no longer meet cleanly. Timing synchronization is a critical integration requirement, and it tends to surface only after a line is sped up.
Splitting Print Data Across Printheads
The controller divides one artwork into two or more bands and sends each to a different printhead, following the split position you configure.
Choosing that position is both a technical setting and part of layout design. Put the split between characters or in white space and it is far easier to manage than a split running through the middle of a character.
Barcodes Crossing a Stitch Line
You can configure it, but the risk is higher and it is better avoided at the planning stage.
Positional deviation between printheads affects dimensional accuracy at the boundary, and dimensional accuracy is what barcode readability depends on.
Where your layout leaves no alternative, do not judge acceptability by eye. Verify the printed code against ISO/IEC 15416 or your customer's specified standard before committing.
When a customer reports a poor stitch, the cartridge is usually not the variable. In the cases Uniplus has helped troubleshoot, the cause more often sits in a loosened bracket, offset compensation that was never updated after a speed change, or a split position that happens to fall across a barcode. Checking those three first tends to save time before any consumable is replaced.
Print-Height Checklist Before You Request a Quote
This is the RFQ version of the calculation above — the same inputs, organized for a supplier. Having it ready before you request a quote reduces the specification clarifications and quotation revisions that follow.
Content and Layout Requirements
Gather five things:
Applicable Barcode and Labeling Standards
Confirm whether a 1D barcode is included, which barcode specification governs it, and whether downstream scanning is handheld or automated on a conveyor.
Where General Distribution Scanning specifications apply, also confirm whether the item's physical dimensions can accommodate the standard bar height. Gather any labeling regulations covering the product or packaging, plus marking dimensions your customer has specified.
Supported Cartridge Sizes and Print Channels
Provide your printer model, the cartridge formats it accepts and the number of print channels available.
This determines whether extending height later means fitting a one-inch cartridge or moving to a multi-head configuration. You can review cartridges in each format on the TIJ 2.5 industrial ink cartridge line.
The Printer's Actual Printable Height
Work from the printable area the manufacturer publishes, not the nominal printhead swath alone. On some machines the controller, the font settings or the mechanical configuration constrain the usable layout range below the cartridge figure.
To review the trade-offs between height, resolution and ink type in one place, the TIJ Specification Selection Guide: Print Height, DPI and Cartridge Size sets out the full parameter comparison.
Production Speed and Configuration
Provide your current line speed and note any planned increase.
On a single-head printer, speed affects how much margin you have on print quality. On a multi-head configuration it also drives the timing synchronization settings, so a higher line speed may require synchronization recalibration.
Send Us Your Printer Model and Print Layout
Your printer model tells us which cartridge formats and print channels are available. Your layout tells us how much height you actually need. With both in hand, we can usually establish in one pass whether your existing equipment is sufficient, or whether the one-inch or multi-head route needs evaluating.
Compare 12.7 mm and 25.4 mm TIJ Cartridge Options
Already know you need a taller print area? We can lay out the applicable conditions, equipment prerequisites and consumable supply for each format. You will be able to see which one suits your line.
Request a Compatibility Assessment | TIJ 2.5 Industrial Ink Cartridge Line